Choosing the Right Binoculars
Binoculars are optimized for different uses. This guide will help you understand these instruments a little better so that you can make an informed decision when choosing a pair for yourself. Refer to our binoculars review to see which we like best and why.
Step 1: What Size do You Need
Binoculars range in size from pocket-friendly compact models to giant contraptions meant for stargazing or dramatically panning the horizon from the bridge of a large ocean liner.
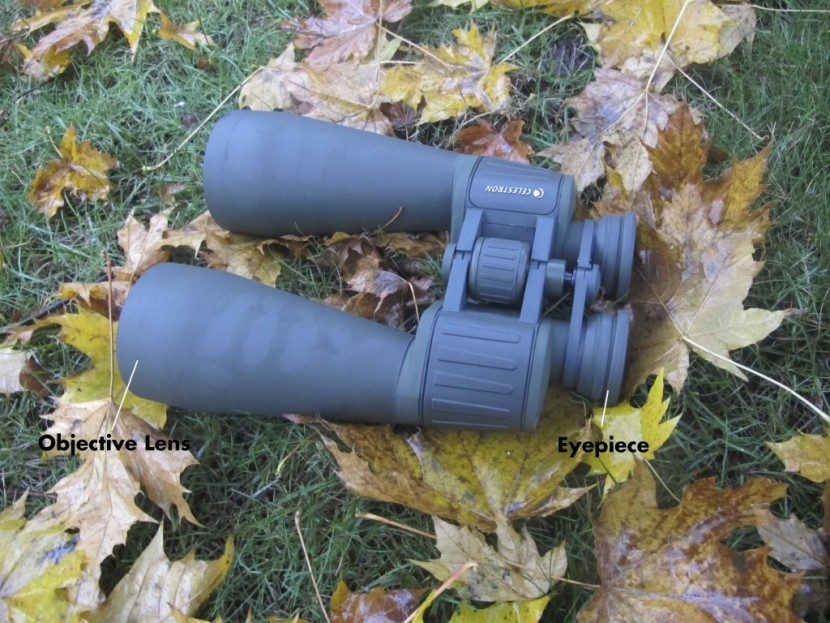
You've probably noticed that most binoculars are described by two numbers separated by an x, 8x42, for example. That first number is the magnification (more on that in a second), and the second number is the size (in millimeters) of the objective (front) lens. The size of the objective lens largely determines the overall size of the binoculars, so that second number essentially describes their size.
The larger the objective lens, the more light that can get into the binoculars, and thus the brighter the image. Larger objective lenses also make the binoculars themselves larger and heavier. You'll want to find a balance between brightness and portability that works for you.
A 42mm objective lens is generally considered to be full-sized. This has become the standard for bird watching and wildlife viewing. At this diameter, you'll generally be able to make out subtle color differences in birds, even when it's overcast, early in the morning, or late in the day. However, bins in this size range generally weigh a pound and a half or more, which is often more than you'd want to carry on a multi-day backpacking trip.
Objective lenses of 28mm are generally considered compact. Bins of this size often weigh well under a pound. However, you often make significant low-light performance sacrifices when moving to a lens of this size, meaning poor lighting conditions can result in silhouetted images with very little color detail.
Many binoculars offer a 32mm objective lens option. For many, this is a Goldilocks region, offering decent low-light performance without too much extra weight.
If you want to use binoculars for stargazing, you'll want to collect as much light as possible. There are many pairs on the market with 63mm objective lenses for just this reason. However, all of these models are quite heavy.
Step 2: How Much Magnification do You Need?
That first number that generally follows the model name of a pair of binoculars refers to the magnification. For example, an 8x42 pair of bins provide eight times magnification, which makes things look eight times larger. A 10x42 pair offers 10 times magnification, and so on.
Most binoculars offer somewhere between 8 and 12 times magnification, as this is generally the ideal range for bird watching and general wildlife viewing. Beginners should probably veer towards the lower end of this range. While greater magnification makes for a more close-up view, it also presents a few issues. The first is hand shake. At larger magnifications, any twitch of the hand becomes much more noticeable and can make the image appear blurry as a result. As you use binoculars more and more, you'll likely adapt and figure out how to reduce hand shake, but you'll probably want to start out with a more forgiving magnification.
The second problem posed by larger magnifications is a narrower field of view. While it's unlikely you're going to find a bird or other critter that won't fit in even a 12x pair of binoculars' field of view, getting that critter framed in your binoculars is another story. While it seems simple, seeing something and then raising binoculars up to your face and getting them trained on that exact thing is a skill in and of itself. Beginners often have trouble getting a bird within their binocular's line of sight, even when they can clearly see where it is with the naked eye. A wider field of view is more forgiving in such circumstances. You will get better at this the more you use binoculars. It is very common for birders to get an 8x pair as their first binoculars and then a 10x or even 12x pair as their second.
If you're looking for something with greater than 12x magnification, binoculars may not be for you. Above that mark, hand shake becomes unwieldy, even for the steadiest hands in the west. At that point, you'll be looking at a tripod-mounted spotting scope instead.
Surprisingly magnification is not too big a deal for large, stargazing models. Seeing as those stars are literally light-years away, you likely won't notice the difference between 10x and 12x. These bins are meant for gathering light and making things brighter rather than bringing them closer. If you really want to feel close to the cosmos, you'll have to go with a telescope (or fill your phone with Neil deGrasse Tyson podcasts).
Glossary of Terms
Knowing your terminology is important, so let's go over a few things you should know. The first thing you're going to see is some numbers like this: 8X42. The first number is the magnification; the second number is the objective lens size. We will talk about these two items first.
Magnification is how large the image will be through the binoculars vs. your naked eye. In the example of 8x42, an image would be eight times larger than what you would normally see. Magnification also impacts the depth of field, your field of view, and the overall brightness of the image. Magnification also magnifies movement. The higher the power, the harder it is to hold steady. Above 10x, you will probably need a tripod system. We discuss the depth of field and field of view in more detail below.
Objective Lens: Lens size determines how much light enters into the binocular and is transmitted to your eye. In our example above, the objective lens is 42mm in diameter. A larger objective lens will allow for better viewing in low light with similar magnification. A larger objective lens has a better potential for increased detail and color resolution. The increased detail is due to the size of the airy disc and the airy pattern. An airy disk is the center bright circular region created when light is diffracted through a small circular aperture. The central disk is surrounded by less intense rings or an airy pattern. Since your binoculars are one big aperture focusing many dots of light, the more overlap of the airy pattern, the less detail. However, the biggest determining factor is the optical quality. A larger objective lens provides a sharper image at a distance with similar optical quality. A large objective lens uses more glass and, therefore, will be heavier. 50mm is considered the limit for carrying around.
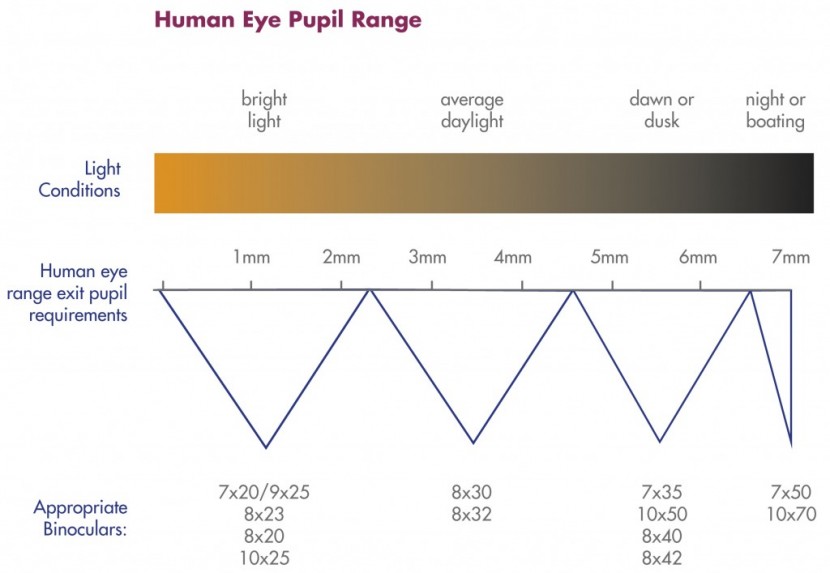
Exit Pupil: Magnification and the size of the objective lens determines the size of the exit pupil. You can see the exit pupil by holding the binoculars at arm's length and looking at the eyepiece. That round dot of light is the exit pupil. To compute the exit pupil, you divide the diameter of the objective lens in millimeters by the magnification. For our 8X42 binoculars, we would divide the objective lens 42mm by the magnification 8, or 42/8 for an exit pupil of 5.25. If we look at a pair of compact binoculars, say a pair of 8x25, we would have an exit pupil of 8/25=3.125.
Why does this matter? It doesn't, as long as there is enough light so that the pupils of your eyes are smaller than the exit pupils of your binoculars. Some articles claim that this is wasted light because your iris blocks some of the light. We like to think of it as unused potential light. With the 8x25 binoculars in the example above, when it gets dim enough for the pupils of your eyes to exceed 3.125mm in diameter, the binoculars are restricting the light available to your eyes. A healthy young adult's eyes can achieve about a 7mm pupil opening, so a 3.125mm exit pupil from your binoculars can be quite limiting in dim light.
In broad daylight, the average adult has a dilated pupil of 3mm. The diameter of a healthy young adult can range be between 2mm to 8mm, and as you get older, it can get reduced to 5-6mm. A smaller exit pupil also makes it harder to center your eye on the image. Your eye needs to be centered exactly over the exit pupil to see.
If your eye's pupil is dilated to 3mm and your binoculars' exit pupil is 3.125mm, this could make it hard to use on a pitching boat or to see a fast-moving animal. A larger exit pupil can also help provide eye relief and help people with eyeglasses. Just remember the exit pupil is not a measure of brightness. The quality of the optics can affect brightness more than the exit pupil.
Relative Brightness is the exit pupil squared. The relative brightness has no relation to how bright a pair of binoculars will be. The quality of the optics has more to do with the brightness of the binoculars than exit pupil size.
Twilight Factor is the theory that small bright images can have as much detail as large dim images. Here is the best explanation of the theory behind the twilight factor: let's say you're reading a newspaper. If you're in low light, you have to hold the paper closer (increased magnification). If it's bright out, you can hold the paper further away (decreased magnification).
Twilight factor is computed by multiplying the objective lens diameter by the magnification and then taking the square root of this product. Thus an 8x42mm binocular has a product of 336 (8x42=336). The square root of this is 18.33 (√336=18.33). This number may seem reasonable when comparing an 8x42 pair of binoculars with a twilight factor of 18.33 with an 8x25 pair with a twilight factor of 14.14. The twilight factor really only comes to play when looking for binoculars to use during twilight or for astronomy. Again, this formula also doesn't consider the optical quality that has a tremendous impact on the perceived brightness of the optics.
Eye Relief is the distance the eyepiece of a binocular can be held away from the eye and still present the full field of view. This is important because longer eye relief reduces eye strain and makes it easier for people who wear glasses. The longer eye relief would provide a full field of view for someone who wears eyeglasses. A rule of thumb is, if you wear glasses, you'll need at least 15mm of eye relief.
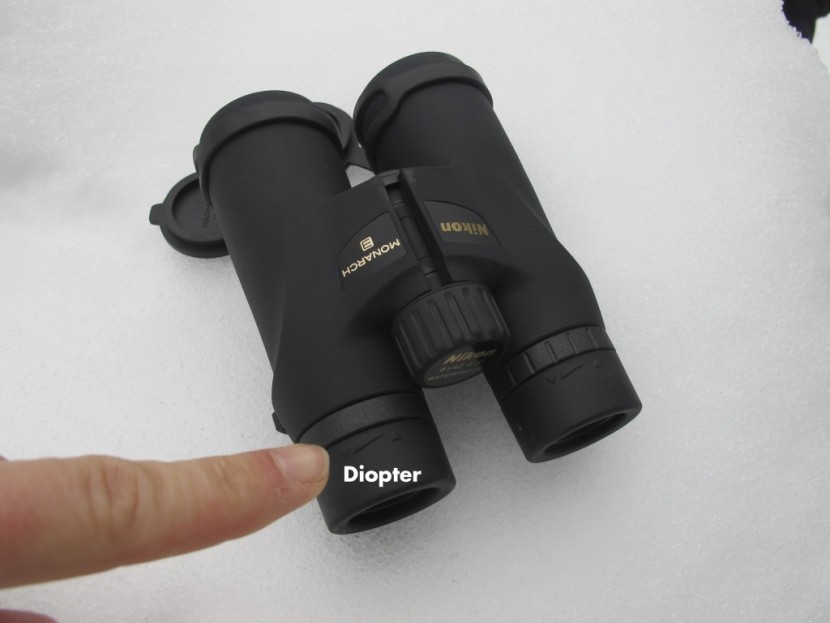
Diopter is the adjustment that allows you to match your individual eye strength. This allows a sharp image in both barrels of the binoculars if you have eyes with differing clarity of vision. Note, only one side (or barrel) of the binocular has a diopter adjustment. To adjust your diopter, use the following instructions:
Focus the non-adjustable side to sharp focus with the main focus wheel using only that eye and on a specific object 50 to 75 feet away. Now with only the eye open on the adjustable side, not moving the main focus wheel and looking at the same object, bring the object into sharp focus using only the diopter adjustment. Now both sides of the binoculars are adjusted to come to sharp focus for both of your eyes simultaneously. Though most diopters are on the eyepiece, some are integrated into the main focus wheel. If you have any questions about adjusting your diopter, please refer to the manufacturer's documentation.
Field of View/Angle of View is the diameter of the circular viewing field. It is defined by the width in feet or meters of the area visible at a distance in yards or meters (usually 1000 yards in the USA). The angle of view is the maximum view you are capable of seeing through the binoculars expressed in degrees. You can easily convert from one measurement to the other by knowing that one angular degree is equivalent to 52.5 feet at 1000 yards. Multiply 52.5 by the angle of view to find the linear field of view. Or divide the linear field of view to get the angle of view.
The field of view decreases as magnification increases. As the field of view decreases, it is more difficult to track moving objects. Following a moving object with 10x binoculars is more difficult than with 8x. It can be more difficult to find an object at a distance with a 10x pair since your initial aim needs to be better. However, objects stand out better at higher magnification, especially stars. The eyepiece can also provide a wider field of view. These are special wide-angle binoculars. With wide-angle binoculars, you have a short eye relief along with added weight and optical distortion on cheaper models.Depth of Field is how much of your view is still in sharp focus behind and in front of the object. The depth of field increases proportionally with distance. For instance, your depth of field is much greater at 20 yards than it is at 20 feet. Depth of field also decreases as magnification increases. In practice, when an object moves and its distance from you changes. You will have to adjust your focus more often, or if you're looking at two objects, one might be out of focus.
Optical Quality describes the mounting, the lens coating, and the glass type used. These things will affect the quality of the image and the brightness more than anything else. This is what separates a good pair of binoculars from an inferior pair. When light enters the optics, it needs to be focused onto an image with minimal loss to obtain as bright and sharp an image as possible. As the different colors of light (think colors of the rainbow) pass through the lenses, they bend at slightly different angles, similar to a prism or chromatic aberration.
Different lenses have different shapes, types of glass, and designs that are used to get each of the basic colors to focus correctly at the right point. Uncorrected light produces blurred images with distortions and muddied colors. Optic manufacturers use very dense (ED, HD, SD) glass and minerals such as fluorite (FL) to help limit the amount the light waves bend. These bending light waves are called aberrations. Other examples of aberrations are astigmatism, spherical, and coma.
Optical Coatings: When light strikes a glass surface, up to 5% of the light could be reflected and scattered away from your eyes. With up to 20 glass-to-air surfaces, that can be a significant amount of light lost to scattering. Current optical coatings can reduce this to less than a quarter of a percent. Coating the prism adds cost, as does the quality of the coating. The coating needs to be a few millionths of an inch thin and uniform. A little too thick or thin, and the coatings won't work effectively. When comparing coatings, you are going to see the following terms:
- Coated (C) Optics: a single anti-reflective coating on at least one lens surface
- Fully Coated (FC) Optics: multiple anti-reflective coatings on at least one lens surface
- Multi-coated (MC) Optics: a single anti-reflective coating on all air-to-glass lens surfaces
- Fully-multi-coated (FMC) Optics: multiple anti-reflective coatings on all air-to-glass surfaces
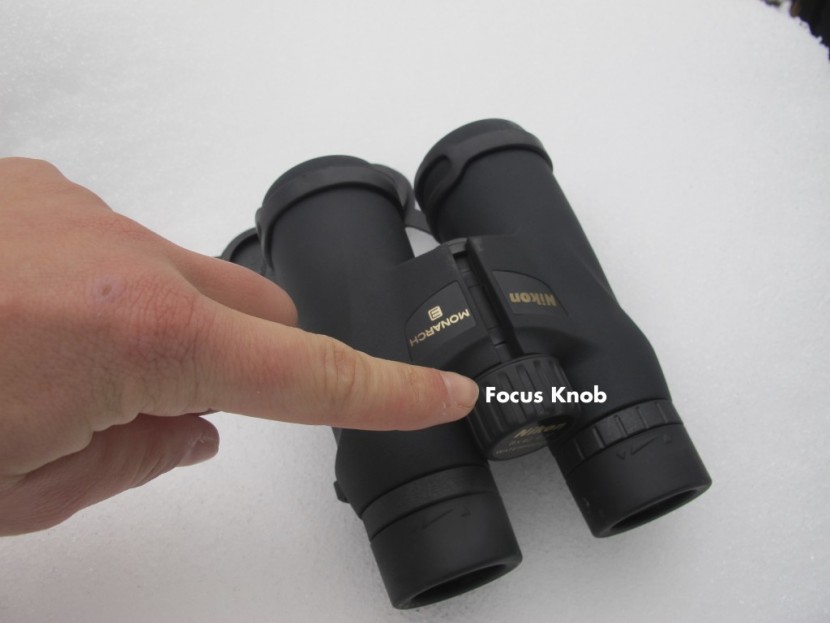
Focusing: Ease of focusing is an important factor to consider when choosing a pair of binoculars. When evaluating focusing, most binoculars use a central focusing knob that you turn while looking through the optic. Getting the sharpest focus possible may require very fine adjustment. This can be done in several ways. You can increase the number of revolutions that it takes to focus, making the adjustment finer. This slows down the focusing process. Extra time needed to focus can mean the difference between getting a good view of a moving object or not.
Variable-speed focus allows rapid turning of the knob to yield coarse adjustment, while slow turning yields fine adjustment. This system works very well but takes time to get used to. The use of two separate focusing knobs, one for coarse and one for fine focusing, can also be used, though uncommon.
Another consideration with focusing is the ease and smoothness of the system. The focal knob should comfortably be positioned under your index finger as you hold the binoculars. It should operate evenly and smoothly without any looseness, stiffness, or irregularities of movement.
Focusing can also be internal or external. Internal systems use a lens element inside the system that moves back and forth. External systems move the eyepiece back and forth. Independent focusing systems have a focal ring at each eyepiece and allow you to manually focus each eye. The independent focus system is usually found on large binoculars used for astronomy or military purposes.
There are “focus-free” or “fixed-focus” binoculars that have no focusing mechanism other than eyepiece adjustments that are meant to be set for the user's eyes and left fixed. Fixed-focus binoculars are great for action because you don't need to adjust your focus. The focus is simply pre-set at about 40 ft to infinity. Fixed-focus binoculars require a large depth of field, which requires a lower magnification, such as 7x.
Weatherproofing: There are two types of designations commonly used when talking about weatherproofing. The differences are: a weather-resistant optic will withstand the occasional light shower but will not withstand submersion or extended use in wet conditions. weatherproof or waterproof optics means that the optics shouldn't allow water intrusion under most circumstances. Sometimes they are even rated to a depth of submersion for a period of time. Some manufacturers will even have an IP (International Protection) Rating. Binoculars with external focusing are sealed with an “o” ring, and over time these can wear, dry out, or get damaged. The result is that moisture or dust can get into the interior, settle on the optics, and degrade your view.
Armor is an outer coating of rubber or synthetic material. This protects the binoculars from scratches and corrosion. It can also make the binoculars easier to hold. A rubber coating does not make a pair of binoculars waterproof.
Gas-Filled are binoculars that have been filled with gas-like nitrogen to prevent interior condensation. This can happen when a pair of binoculars is moved from a warm environment to a cold environment or vice versa. This causes condensation inside the internal optics, fogging them up. Mold can also form over time from repeated condensation. Most weatherproofed optics are gas-filled, but not always.
Uses
When choosing a pair of binoculars, you are faced with making compromises. Binoculars that you use for astronomy will not be compact, and you probably won't take them hiking. Below are some things to consider based on use:
Hiking/Travel
For hiking, backpacking, and traveling, size and weight will probably be your main concern. A roof prism or a reverse Porro prism will be more compact. Look for a pair with an objective lens between 32mm to 20mm. Most compact models have a magnification of 6x, 7x, 8x, 10x. 7x and 8x give a nice balance between magnification and a wide field of view. Suggested size: 8x25.
Birding/Hunting
Size and weight are a consideration for wildlife viewing but don't compromise too much. Look for an objective lens between 35mm and 42mm. You can use a pair of binoculars with an objective lens of 50, but it will add weight. For magnification, stick to 7x, 8x, or 10x. Lower magnification will give you a wider field of view, and higher magnification will provide more detail. If your primary use is in big open spaces, go for more magnification like a pair of 10x42. For densely wooded areas, go for lower magnification and a wider field of view like 8x42. 8x42 is the most popular birding and wildlife viewing binocular size.
Marine
When out on the water, a rugged, waterproof design is essential. Low magnification will make it easier to see on a pitching boat. A magnification of 7x to 8x should do just fine. You will also want a larger objective lens. Look for an objective lens that is equal to or greater than 35mm. Suggested size: 7X50.
Astronomy
When sky viewing at night, a large objective lens is going to help you gather more light. Increased magnification with the same aperture will darken the background. This allows the stars to really stand out. Lower magnification will give you a wider field of view. You might also want to consider a pair of binoculars that can be mounted on a tripod. Look for an objective lens that is 42mm or greater. Magnification for handheld binoculars should be between 8X to 12x. Any larger and you will need a tripod or monopod. Suggested size: 10X50.
History
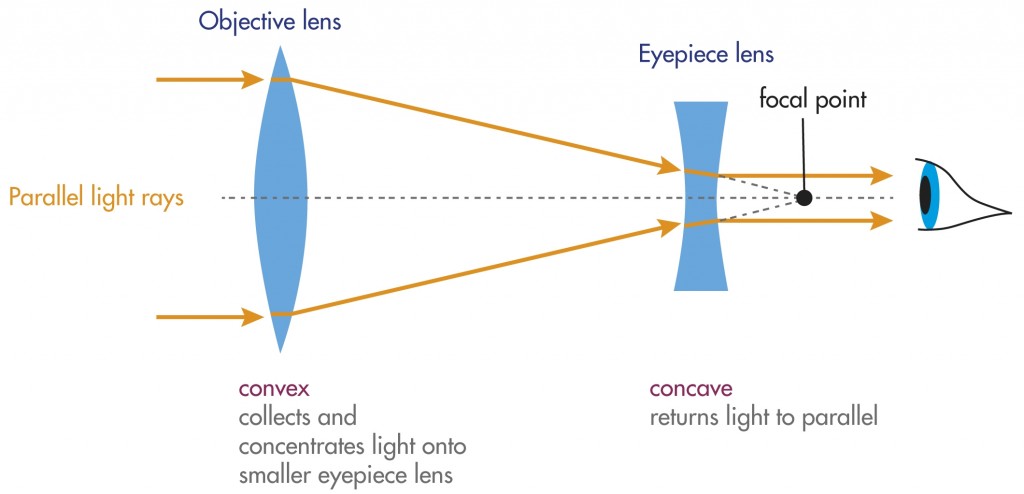
The history of the binocular goes back to the 17th century and the first telescopes. Even early on, it was known that you had better perception looking through two lenses than one. The Galilean telescopes at the time had a convex objective lens to capture light. It then used a concave eyepiece to right the image. Galilean telescopes and binoculars produced a narrow field of view with low magnification.
The next major advancement was Keplerian Optics which used a convex eyepiece and relay lens in between the objective lens and eyepiece to flip the image. The lengths of these binoculars and telescopes were quite large to account for the long focal length.
It wasn't until the middle of the 19th century that people started using prisms. The first prisms used were the pro prism, invented by Ignazio Porro. The Porro prism allowed for the long focal length of the Keplerian Optics by folding the optical path. By combining two pro prisms, it increased the focal length while flipping and righting the object. This allowed for a more compact and manageable size. The double Porro prism gives most older binoculars that classical look.
About 50 years later, you get the creation of the roof prism. The roof prism has the advantage of being in line and creates that straight barrel look. The roof prism was more complicated to produce, and the silvered surfaces reduced the amount of transmitted light. With modern coatings, the roof prism can perform on par with the double pro prism, though roof prism binoculars are still more complicated and therefore more expensive.
Ask an Expert: Angie Merritt
Angie is a wildlife biologist that specializes in birds and avian research. She has worked for over 10 years on many different research, monitoring, and rehabilitation projects. She's seen birds in all sorts of places, including Northern Minnesota, coastal California, the Sierra's of California, Glacier National Park, Missouri, Arizona, and Kauai. She's currently a graduate student at UC-Davis working on a project with an endangered bird called the Ridgeway rail in the San Francisco Bay area.
What type of binoculars do you consider ideal and use, and for which situations?For the money and quality, most non-profits or struggling graduate students with an observational element to their project go with Eagle Optics, the company I feel has set the bar. The other common player we see at this table is Nikon, specifically their “Monarch” model.
The high rollers in the binocular world boil down to Swarovski, Leica, and Zeiss, which will run into the thousands of dollars. These high-end bins (or knockers, both affectionate nicknames used by people who live in the binocular world) are beautiful but not practical for most people. The more obscure but great brands in my experience: Vortex and Pentax.
Two numbers are associated with bins, and they are organized in the “x” manner, e.g., “8 x 40.” The first number represents the magnification, usually 8 or 10 is all you need. The bigger the magnification, the harder it is to stabilize your view. Since I drink too much coffee in the early mornings, I often prefer an 8x40. However, when I can handle it, I go with my 10x50s. When I'm searching for nests, the higher magnification is key because you are peering deep into a bush for a little bird nest or looking high on a cliffside for a little puka with a thrush in it. However, my hawk-watching friends go with the smaller 8x magnification because they can react and focus quicker on a bird of prey zipping by, which makes for easier identification.
The second number in the bin world represents the lens diameter of the outer lens; this represents the amount of light let in for a clearer, sharper image. This becomes important at dawn and dusk. If you are just shopping for the best deal and want an inexpensive product, ensure that the second number represents at least five times the magnification: so “40” is most frequently associated with 8x, and “50” is most frequently associated with 10x. This does not mean the second number needs to be even or odd, so go for the “8x43” or “10x54” if you like.
What is the most important aspect that you wouldn't compromise when buying a pair of binoculars?I would not compromise the magnification or lens size in the correct ratio. However, waterproofing is equally important for anything I have done.
What type of strap do you use and why?Affectionately called the binocular “bra,” I like Cabela's Pro harness.
What types of things do you do to maintain good working condition?I use single-use lens wipes. I try to do this sparingly because you really never know if there is a tiny grain of something on the lens that will scratch. I have taken waterproof models and dunked them before wiping them down, but this is still a risky thing.
Do you have any advice on how to keep your binoculars safe and clean when in the field?KEEP YOUR LENS CAPS ON. Clearly, you need to take them off before you can see the birds. But, put those caps back on afterward. They come with any decent product, and you shouldn't buy them if they aren't included.
What types of lenses would you buy if you wanted a great all-around binocular?My perspective is pretty avian-centric, but the bird business is a big part of the world economy (some $80 billion, according to some). Some hunters use them beyond birds, and some people probably spy on their neighbors. For the big game stuff, or if you are a long-distance backpacker, go with cheap and light, so that you always have them on you. In this case, the lightweight Bushnell lines are perfect, even if you sacrifice much of what we have just recommended regarding magnification, brightness, and field-of-view. They should be a part of every camping kit—you never know when you might see Sasquatch.
What's the coolest thing you've observed?I saw a tiger shark take out a baby albatross that swam a little far out of its comfort zone near Midway Atoll in Hawaii. The boat captain let us take turns with a pair of decent Nikons, if I remember the brand correctly. I wish I had brought my own!
Do you have any tips for bird and wildlife watching?Do not forget your binoculars at home. This is poor form every time.
Are there any other things that you think are important to consider when choosing a product that we didn't cover?Customer service is also important to me. I mentioned Eagle Optics: they repair and replace for free (excluding shipping) and do a bang-up job every time, and the other companies I mentioned also have good reputations.
What other types of accessories do you use? What things do you look for in those accessories (tripod or stabilization device, camera adapter, special strap, etc…)?Honestly, I use nothing other than the bins (which come with lens caps or do not buy said bins) and the bino-bra (which will save your neck). I would use a scope before I would get a tripod or stabilizer. Scopes get brought into the field for color-band re-sighting, nest monitoring, or remote island monitoring. Binoculars are meant for use during an active task. If you are going to set up a base camp, you might as well have a scope.

